
Glocks are the most popular and reliable polymer handguns on the market today. However their double stack magazine results in their grips being rather bulky or large in the hand. Not getting a good grip on your pistol can impact performance. This can be easily solved by making the grip smaller.
Making the grip smaller is easier to do on a polymer frame than a steel or aluminum one. Today we’ll go over how you can easily reduce the grip on your glock and some of the pros and cons that occur.
A guide rail, like the GripFix™ Hump Eliminator™, a hacksaw, dremel tool/stippling tool, glue, and a soldering iron/heat gun are what you need to reduce the grip of your Glock.
But before you pick up any of your tools to attack your Glock let’s look at why you should and shouldn’t reduce your Glock grip.
Ins and Outs of Glock Grip Reduction
First we have to understand what we are modifying on the gun. The grip of the gun is where the dominant hand interfaces with the gun. This gives us our primary control over the gun and generally allows us to activate most of the controls on it with one hand.
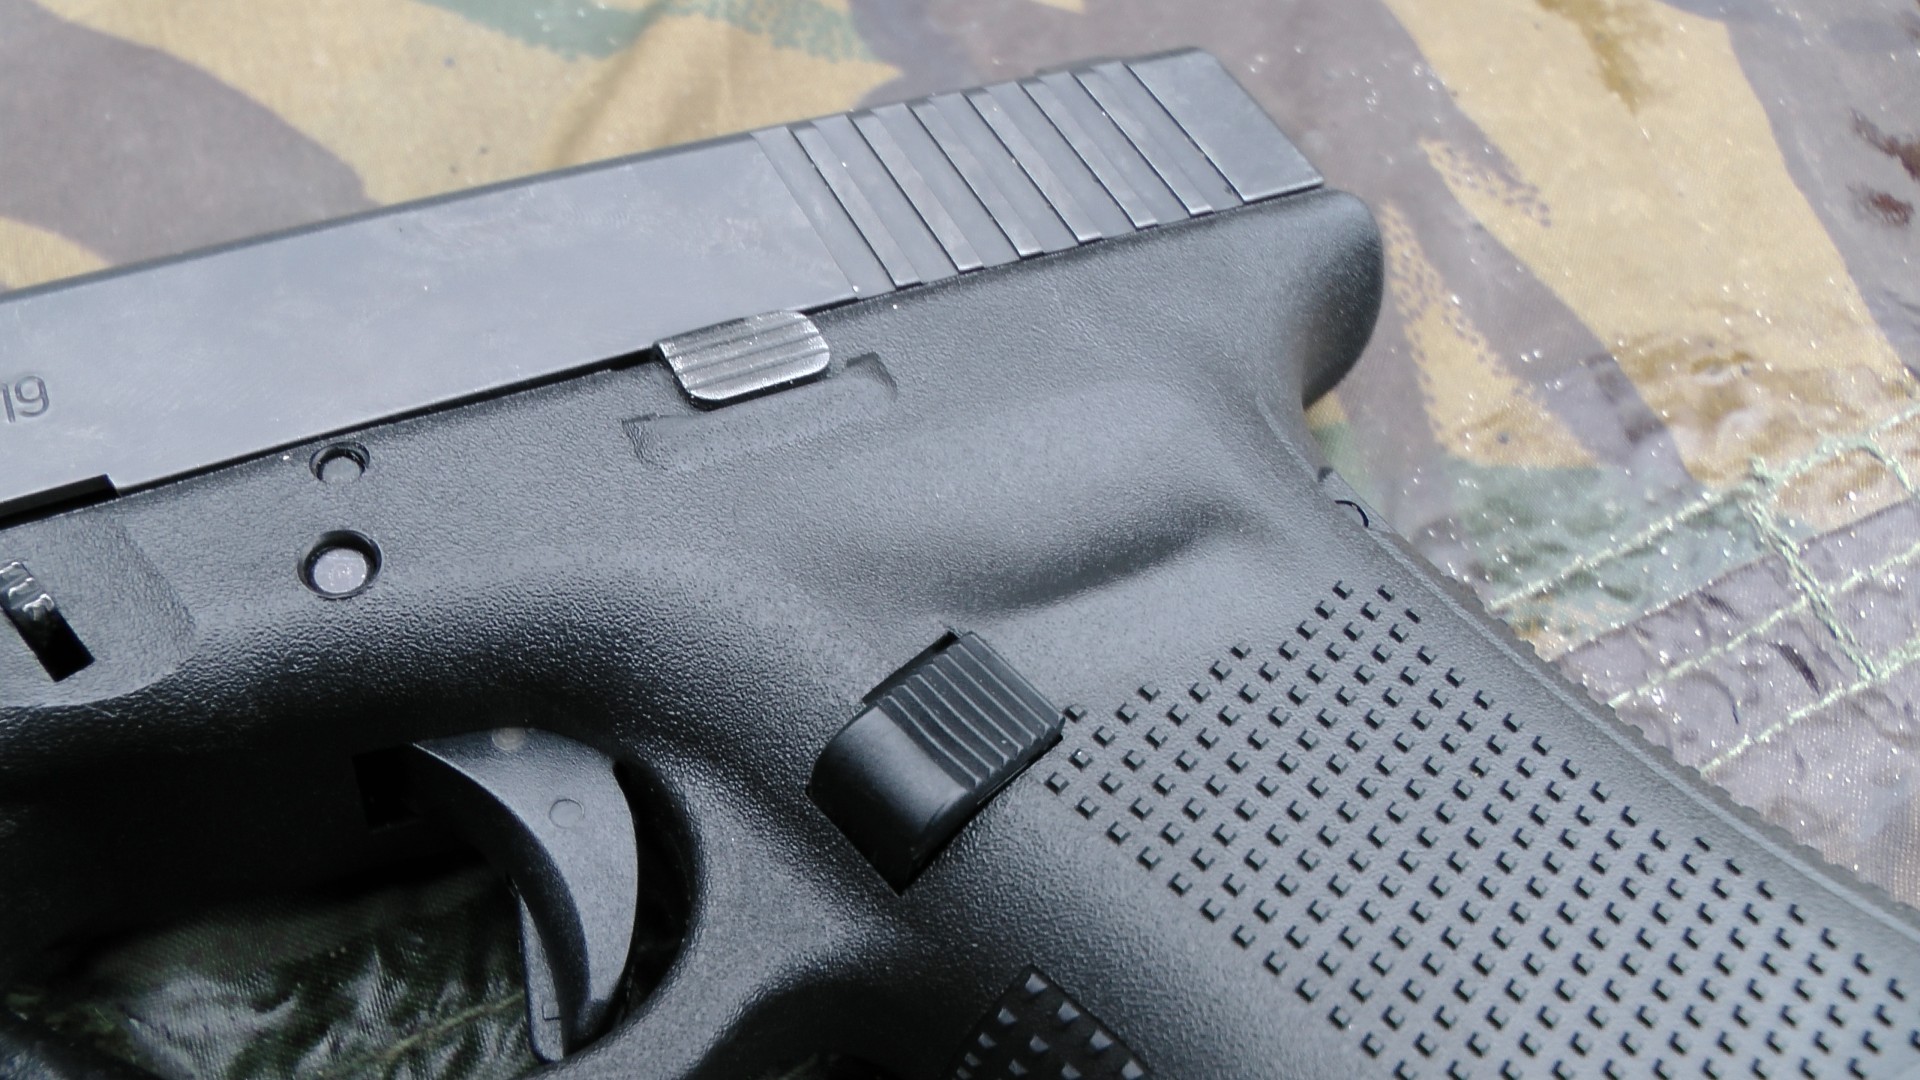
Glock grips generally swell near the base of the grip along the backstrap of the gun. This pushes the grip angle forward which in turn drives the point of the gun down to a horizontal plane. If a more upright angle is used with a traditional glock grip, the gun would point in the air rather than at the target.
Some people prefer the more upright grip of a 1911 pistol than these angled grips because they keep the wrist in a neutral position. That neutral position cannot be achieved on a Glock without modification.
When we reduce a grip and do other related modifications we are making it easier to hold and control the pistol. This has a direct impact on our performance since we will have a better grip on the gun if we do it properly.
There are additional modifications that are applied to the grip when a grip reduction is done. These are finger groove removal, undercuts/trigger guard polishing, and stippling. Because these modifications tend to go hand in hand with grip reduction services we will include them under grip reduction.
Benefits
The benefits of a grip reduction are simple. A smaller grip is easier to get your hand around, especially if you have a smaller set of hands.
A reduced grip will change the angle that the gun sits and can bring the barrel and sights into a more natural pointing angle in the hand. That natural angle is different from person to person.
Combined with a trigger undercut and stippling, a reduced grip will be more secure in the hand and more comfortable depending on the stippling. This will result in better handling and control of the gun.
You can also reduce the grip size and hand placement by removing the finger grooves on Gen 3 or Gen 4 Glock frames. These grooves are more specifically targeted when grip modifications are being done. This resulted in the finger grooves being removed from the new Gen 5 frames.
Reducing the grip on a Gen 5 frame will still change how the hand sits on it which can result in a stronger hand placement and a better two handed grip.
Deficits
If you take too much material off of the frame you can damage the frame’s integrity. If the frame is compromised the firearm is unsafe to use and you need to replace that frame before using it again.
If you cut at too steep an angle you can accidentally cut into the magazine area. This will compromise the grip and possibly some of the internals of the frame.
Modifying the backstrap can cause certain add-ons to not work. This ranges from backstraps to special magazine-well adapters. If you train and use modifications that rely on the factory grip of a Glock they will not work with a reduced grip.
An additional concern is the warranty of the gun. If you do modify it, the warranty on the gun will be voided. Not modifying it keeps the gun under the warranty’s protection.
Tools
Before you start the process of reducing the grip on your Glock you should make sure you have the appropriate tools to do so.
The basic tools you will need are a hacksaw, a dremel tool, a soldering iron, a heat gun, and some way to hold the frame in place while you work on it. A vise will work perfectly for keeping your frame in place. You’ll also need some files or sandpaper to touch up any edges.
Additional tools you should have are a guide tool like the GripFix™ Hump Eliminator™ from OT Defense and their Flat BackStrap products. The guide tool will make it less likely that you damage your frame or remove too much material.
Eye protection is recommended and possibly some sort of protective mask to prevent you from inhaling any of the polymer dust that will be produced by using the dremel tool.
Removing the Hump
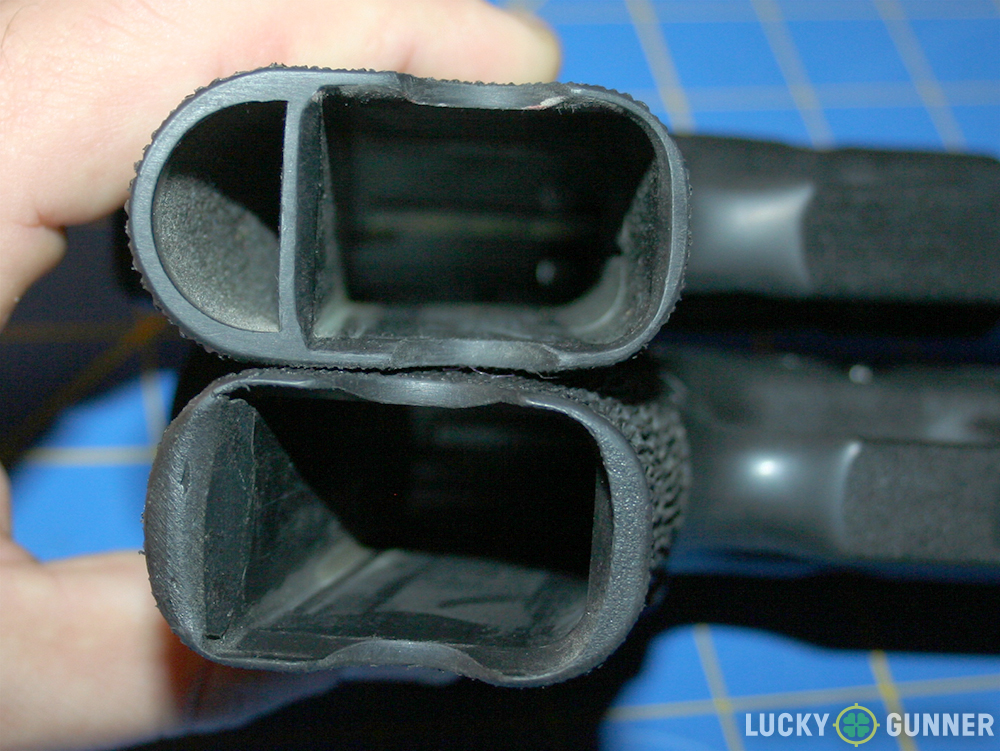
The major part of the grip reduction process focuses on the backstrap of the pistol. This Glock “Hump” tends to be the major factor when it comes to the reasons someone will reduce the grip on a Glock.
While it might be tempting to free-hand the removal of the hump with a dremel tool or a hacksaw, this is one of the areas where accuracy and repeatability will prevent future headaches.
Once you have removed the trigger assembly attach your guide tool with the appropriate hole to the frame.. On the GripFix™ this is the trigger pin hole on the grip. Attach the other end of the guide tool to the rest of the tool with the frame in place.
The guide tool and frame should be placed into your vise or a similar tool. Take your hacksaw and make two cuts. The first will be near the top of the tool and should be going down towards the guide rod. This creates the end for the second cut. You should stop sawing once you reach the rod.
The next cut will follow the guide rod, heading towards your initial cut. This will remove the hump leaving you with a detached piece of polymer.
You now have two options. The first option is to retain the removed piece and use a heat gun and files to reshape the piece to your flatter desired dimensions. You will then use your choice of glue to reattach it to the frame and move on to your next modification.
Your other option is to use a premade item like the Flat BackStrap from OTDefense. This is simpler as the new backstrap is a single premade piece that won’t require you to use a heat gun. However you may have to handfit it into place on the frame. This can be done with files or a dremel tool.
Once it is fit, meaning it does not stick out below the frame and the sharp edges are removed, the Flat BackStrap can now be glued into place. The Flat BackStrap has an additional advantage since it comes with a rubberized glue to attach it.
If you are more of a visual learner or just want to watch someone else do the process you can watch OTDefense’s video here.
There are other methods that are more involved with fewer tools but the most repeatable method uses guide tools like the GripFix™. If you want to see how involved this process is by comparison you can watch that process here.
Finger Grooves
Reducing the front strap of the frame isn’t as intensive as modifying the back strap and in some cases it may not be necessary at all. This mostly comes down to whether or not you find the finger grooves on your Gen 3 or Gen 4 frame a problem. Those generations of Glock that don’t have finger grooves may not need to be modified at all.
If you don’t like the finger grooves on your frame or they naturally sit under your fingers (rather than between them) you should consider reducing them. This can also be done when you are dealing with stippling which we will cover in a different section.
Removing the finger grooves is one of the easier modifications that you can do yourself. You can use a dremel tool or a belt sander for this. Other methods can work but these are the least labor intensive.
All you have to do is carefully grind down each groove to meet the rest of the frame. Make sure you’re not melting the plastic with the speed of your tool. Watch this video to see how easy it is with a belt sander.
Undercut/Trigger Guard Polishing
Closely related to removing the finger grooves is the undercut or trigger guard polishing. The Glock frame has a rather thick trigger guard and it can wear on your middle finger producing what is known as “Glock Knuckle”. It causes some irritation which can add up if you are practicing with your firearm regularly or for long periods.
This has been traditionally solved with an undercut. A dremel tool is used to remove material from under the trigger guard to make room for your knuckle. This can be deeper but it is better to take the original depth and extend it forward on the trigger guard.
A great example of properly blending the trigger guard with an undercut and extending the existing cut is this video here.
Stippling
The final modification generally used with a grip reduction is stippling. Glocks come from the factory with very small protrusions on the grip. This is referred to as stippling. It creates more surface area and areas of traction to help keep the gun in your hand in a variety of conditions.
That texture is made to lock the gun into your hand. Some people don’t find factory stippling to be that effective. Some want a more aggressive grip while others want a more blended grip.
Stippling on a grip-reduced frame can meld the polymers together adding slightly more integrity if you are reattaching a reformed backstrap. It also helps blend out the tell-tale line from that grip reduction.
Stippling can be done with a soldering iron or a specially made soldering iron called a stippler with pattern specific stippling tips. But the process remains similar. You apply a hot piece of metal to the plastic to produce your desired design. The specialty tips allow for more complex patterns while the more free hand styles tend to be simpler designs.
One basic rule is to not put the iron or stippler too deep into the polymer. This can cause the tip to burn through the plastic. You can also create a weak point in the plastic by making a thinner section of the frame too thin if you push your tool too far.
If you are using a patterned tip be sure to take breaks. This will help keep the tips hot and the pattern crisp. If the patterned tip you are using is starting to be less crisp you need to slow down and let the tip heat up. You could also use a stippler with a higher base heat instead, but this increases potential frame damage.
Additionally since you are melting plastic the tip can get clogged with material. You can take a break and let the material burn off the tip or you can use a copper brush to clear out the pattern. A steel brush could be used but might damage the pattern head you are using.
Stippling does not need to be everywhere. If you do choose to stipple your frame be sure to stipple the area where your hand needs to stay. This means you can leave the area where the webbing of your hand goes un-stippled to help get the hand where it needs to be during the draw.
Stippling location can also be a factor if you don’t want to stipple the whole grip. The primary areas to stipple in are the front strap, the back strap, and the sides. Those locations listed in order of importance will help the most with improving your grip through the use of stippling.
Some stippling designs are extremely aggressive and can be uncomfortable for extended use. It’s important to choose a stipple design that you find both functional and visually pleasing but won’t damage your hands with long use.
This is of course modified if you use gloves when shooting. An aggressive texture might be more bearable with gloves but will possibly shorten the gloves’ life. On top of this if the gloves are already textured they might interfere with getting the proper grip.
It is better to test out your skills on similar plastics to a Glock frame before attempting to stipple your Glock’s frame. This can be done on decommissioned frames or spare frames. Additionally the Glock gun case can be used or any similar thermo-plastics. Some frame alternatives will behave a little differently than a Glock frame but will help with your hand-eye coordination and technique.
There are alternatives to stippling. If you are not confident to do your own stipple job, or don’t have the tools to do it, you can use skateboard tape in its place.
Skateboard tape can be easily purchased and cut to the shape you need. A single strip can be placed on the front strap of grips without finger grooves or smaller pieces can be placed between finger grooves for added grip.
This poor man’s stippling can be applied over most of the grip as desired and is a good solution if you don’t have a tool to stipple with. It also cuts down on the chances of damaging the frame with a stippling tool.
For an example of stippling with a special tip try this video. If you would like to see the different types of stippling head try this one. And if you want to see a very basic stipple job try this tutorial.
Conclusion
Grip reduction on Glock pistols are a very useful modification to have. The benefits of a more compact grip in terms of controllability, comfort, and performance certainly outweigh struggling with a grip that is too large or too angular.
Doing your own grip reduction will help you get more acquainted with your gun and is a useful skill to add to your hobby. The cost savings of doing it yourself are also a nice benefit as many grip reduction services start around 40 to 50 USD mark and go up from there. This does not include the other modifications of stippling, undercuts, etc.
Keep in mind this is per gun. The GripFix™ Hump Eliminator™ is roughly 80 USD but if you have multiple Glocks that need to have their grips reduced, the guide tool pays for itself after the first two pistols.
The tools required to reduce your grip yourself are not all that many, especially if you forgo stippling. It comes down to roughly four tools and time if you have a guide tool. And even then, most of the effort can be finished in well under an hour.
Stippling adds a little complexity and a few more tools. But it beats sending your gun off to someone else and wondering when you’ll get it back.
OUR RECOMMENDED TACTICAL GEAR LIST:
- Best Health and Fitness Tracker, Whoop. Get 1 Month Free: See it here!
- EDC Assisted Opening knife we can’t live without: See it here!
- Best EDC Concealed Carry Pistol: See it here!
- Extreme Performance Morning Dink: See it here!
- Best 3D Printer For Gun Parts and Accessories: See it here!
- Our Top Rated EDC Flashlight: See it here!
- AR Red Dot Sight We Can’t Live Without: See it here!
- Best Handgun Safe For Quick Access: See it here!
- Top Wireless Security Camera For Home Security: See it here!
- The Range Bag You’ve Always Been Looking For: See it here!
- CIA Approved Sharp Shooting Course: See it here!